
Introduction
Installing an SMD screen isn’t just about mounting a panel on a wall — it’s about ensuring years of flawless performance, optimal visibility, and maximum return on investment. Whether you’re setting up an indoor LED video wall for a corporate lobby in Lahore or an outdoor SMD display for a billboard in Karachi, the installation process determines everything that follows.
In Pakistan’s rapidly growing digital signage market, businesses from retail stores to sports stadiums are investing heavily in SMD screens. But a poorly installed LED display can lead to pixel failures, brightness inconsistency, weather damage, and costly repairs. This comprehensive guide walks you through the entire SMD screen installation process — step by step — so you know exactly what to expect and how to ensure a professional setup.
What You Need Before SMD Screen Installation Begins
1. Site Survey and Structural Assessment
Before any LED panel goes up, a thorough site survey is essential. Here’s what professional installers check:
- Wall strength and load capacity: A typical P10 outdoor SMD panel weighs approximately 30-35 kg per square meter. The mounting structure must support this load plus wind pressure for outdoor installations.
- Viewing distance and angle: The pixel pitch you’ve chosen determines the optimal viewing distance. A P3.91 screen needs viewers to be at least 3.91 meters away for clear image quality.
- Sunlight direction: For outdoor screens, direct sunlight affects visibility. Installers assess sun angles to recommend appropriate brightness levels (typically 5,500+ nits for outdoor use in Pakistan).
- Power supply availability: SMD screens require dedicated power circuits. A standard P5 indoor LED wall of 4m × 3m consumes approximately 3-4 kW at full brightness.
- Cable routing paths: Data cables, power cables, and control cables need clean routing paths to avoid interference and ensure maintainability.
2. Required Tools and Equipment
Professional SMD screen installation requires specialized equipment:
- LED panel mounting brackets and frames (steel or aluminum)
- Sending cards and receiving cards (typically Novastar or Colorlight)
- Power supplies (usually 5V/40A for most SMD panels)
- Data signal cables (Cat5e or Cat6 Ethernet cables)
- Power distribution units (PDUs)
- Level, measuring tape, drill machine, and torque wrench
- Lifting equipment (scissor lift or scaffolding for large installations)
Step-by-Step SMD Screen Installation Process
Step 1: Prepare the Mounting Structure
The mounting frame is the foundation of your LED display installation. For indoor installations, a wall-mounted aluminum frame is typically used. For outdoor SMD screens, a custom steel structure is engineered to withstand wind loads of up to 120 km/h — critical during Pakistan’s monsoon season.
The frame must be perfectly level. Even a 2mm deviation across a 6-meter span can cause visible panel misalignment and gaps between LED modules. Professional installers use laser levels to ensure precision.
Step 2: Mount the LED Panels
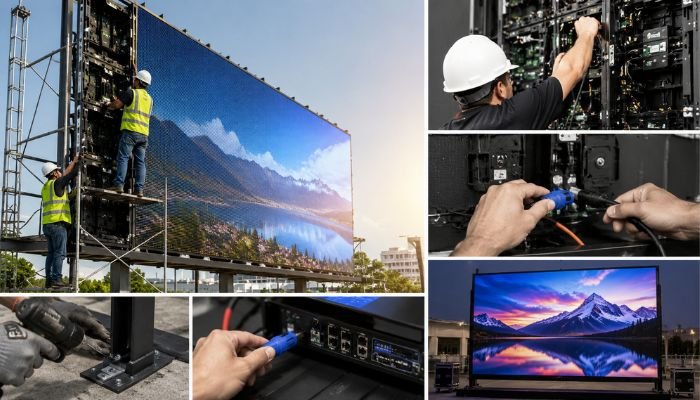
SMD panels are mounted sequentially, typically from bottom-left to top-right. Each panel locks into the previous one using magnetic or screw-on fasteners. Key considerations during panel mounting:
- Maintain consistent gaps: Panels must sit flush with zero visible gaps. A gap of even 1mm creates dark lines visible in the display.
- Check alignment after every row: Don’t wait until the entire wall is up — verify alignment after each row of panels.
- Handle panels carefully: SMD LED modules are fragile. Avoid touching the LED surface directly; always handle by the frame edges.
Step 3: Connect Power Supplies
Each panel connects to a power supply unit. The power distribution must be balanced — no single power supply should be overloaded. A typical setup uses one 5V/40A power supply for every 4-6 LED modules, depending on the panel specification.
Important: All power connections must use properly crimped connectors with heat shrink tubing. In Pakistan’s humid climate, exposed wires corrode quickly, leading to power failures and potential fire hazards.
Step 4: Install Sending and Receiving Cards
The brain of your SMD screen is the control system. Receiving cards are installed in each panel (usually one per panel or every two panels). Sending cards sit in the control cabinet and communicate with your media player or PC.
Most modern installations in Pakistan use Novastar MX series sending cards with TB series receiving cards. The setup process involves:
- Configuring the sending card resolution to match your total screen resolution
- Mapping each receiving card to its position in the display
- Setting up brightness and color calibration profiles
Step 5: Connect Data Cables
Data cables run from the sending card to each receiving card in a daisy-chain or parallel topology. Cat6 Ethernet cables are standard. The total cable length from sender to the farthest receiver should not exceed 100 meters to prevent signal degradation.
Step 6: Configure and Calibrate the Display
Once all panels are mounted and connected, the configuration phase begins:
- Power on sequentially: Turn on the system in stages — power supplies first, then sending cards, then the media player. This prevents power surges.
- Load the display configuration: Using Novastar’s SmartLCT or VX software, input your screen dimensions, pixel pitch, and panel arrangement.
- Run calibration: Adjust brightness uniformity, color temperature (typically 6,500K for indoor, 5,500K for outdoor), and gamma correction.
- Test content playback: Run test patterns — solid colors, gradients, and motion video — to identify any dead pixels or color inconsistencies.
Step 7: Weatherproofing (Outdoor Installations Only)
For outdoor SMD screens in Pakistan, weatherproofing is non-negotiable. The monsoon season brings heavy rain, dust storms, and humidity spikes. Essential weatherproofing steps include:
- Sealing all panel joints with weather-resistant rubber gaskets
- Applying silicone sealant around the frame perimeter
- Installing a weatherproof cabinet for power supplies and control equipment
- Ensuring IP65 or higher rating for all outdoor components
- Adding a rain canopy for top-edge protection
Common SMD Screen Installation Mistakes to Avoid
Inadequate Power Planning
The most common cause of LED display failures in Pakistan is insufficient power infrastructure. Voltage drops across long cable runs cause brightness inconsistency. Always use adequately rated cables and keep power supply units close to the panels they serve.
Skipping the Site Survey
We’ve seen installations where the screen was too bright for the indoor space, causing glare and viewer discomfort. A proper site survey determines the right brightness level — 1,200-1,500 nits for indoor, 5,500-7,500 nits for outdoor, and 2,500-3,500 nits for semi-outdoor applications.
Poor Cable Management
Tangled cables behind the screen aren’t just ugly — they’re a maintenance nightmare. When a panel needs replacement, technicians spend hours tracing cables. Proper cable management with labeled, bundled, and routed cables saves significant time during future servicing.
No Backup Power Plan
For critical installations like stadium displays or control room video walls, a UPS or backup generator is essential. Power fluctuations in Pakistan can damage sending cards and corrupt display configurations.
How Long Does SMD Screen Installation Take?
Typical installation timelines in Pakistan:
- Small indoor LED wall (2m × 1.5m): 1-2 days
- Medium indoor video wall (4m × 3m): 3-4 days
- Outdoor billboard (6m × 4m): 5-7 days including structure fabrication
- Large stadium display (10m × 6m+): 2-3 weeks
Post-Installation: First 48 Hours Checklist
The first 48 hours after installation are critical. Here’s what to monitor:
- Temperature check: Touch the back of panels — they should be warm but not hot. Excessive heat indicates power supply issues.
- Brightness uniformity: View the screen from multiple angles and distances. Any noticeable brightness differences need calibration adjustment.
- Dead pixel scan: Display a solid white image and look for black spots. Then display solid red, green, and blue individually.
- Cable connection stability: Gently tug on data cables to ensure they’re firmly seated. Loose connections cause flickering.
- Content playback test: Run video content for 4+ hours continuously. Watch for frame drops, color shifts, or signal loss.
Frequently Asked Questions
Can I install an SMD screen myself?
For small indoor LED panels (under 2 sqm), DIY installation is possible with proper guidance. However, for anything larger or any outdoor installation, professional installation is strongly recommended. Improper installation voids most manufacturer warranties and risks equipment damage.
Do I need permission to install an outdoor SMD screen in Pakistan?
Yes. Outdoor billboard installations require permits from local authorities — Cantonment Boards for military areas, CDWA for Lahore, and KMC for Karachi. The process typically takes 2-4 weeks and requires structural drawings and safety certifications.
What warranty covers installation issues?
Most professional installers in Pakistan offer a 1-year installation warranty covering labor and cabling. LED panel warranties (typically 2-3 years) cover manufacturing defects but not installation-related damage.
How often should I recalibrate my SMD screen?
Indoor displays should be recalibrated every 6 months. Outdoor displays need calibration every 3 months due to Pakistan’s dust and temperature fluctuations. Professional calibration takes 2-4 hours depending on screen size.
Conclusion
Professional SMD screen installation ensures reliable performance, excellent display quality, and long-term durability. From site preparation and secure mounting to wiring, configuration, and testing, every step matters.
Pro SMD Screens provides complete SMD screen installation services in Pakistan for indoor, outdoor, and rental displays, with skilled technicians and reliable post-installation support. Contact us for a professional site survey and installation solution.